Documentation
2D ColliderGen with
2D Toolkit
Table of Contents
ToggleVideo Tutorial
General Workflow
When using the 2D Toolkit framework, the workflow is centered around an additional “ColliderGen TK2D” window which extends 2D Toolkit’s “Sprite Collection Editor” window by functionality to automatically generate MeshColliders. This “ColliderGen TK2D” window offers parameters such as the number of outline vertices, convexity of the mesh, etc.
Please take a look at the reference section below for further information on all parameters or watch the video tutorial which demonstrates the effect of the different parameters.
Steps
- Add 2D sprites to the scene. We assume that you already know how to add and set up 2D sprites. If you are not familiar with the 2D Toolkit framework yet, we recommend to check out the documentation of this great framework first.
- Prepare movable game objects by adding Rigidbody physics components to them. Without Rigidbody components, your objects will remain static.
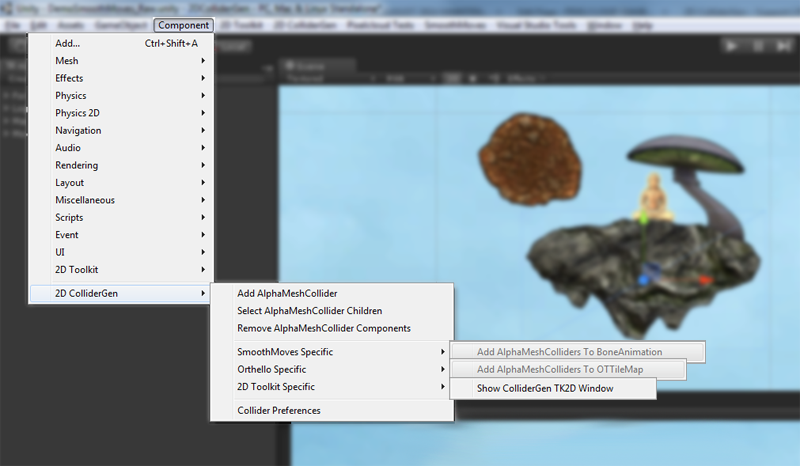
- Open the “ColliderGen TK2D” window. (“2D ColliderGen” – “2D Toolkit Specific” – “Show ColliderGen TK2D Window”)
- Open a Sprite Collection in the Sprite Collection Editor window. (In ‘Project’ window select your SpriteCollection prefab, then in Inspector window hit “Open Editor…” button).
- Select the sprites in the Sprite Collection Editor window that you wish to add colliders to.
- Hit “Update Collider” in the ColliderGen TK2D window to automatically generate polygon colliders for all of them.
- Select sprites where you are unhappy with the collider shape and tweak the “Outline Vertex Count” parameter.
- The movable objects don’t collide with other MeshCollider objects yet –
one of two colliding MeshColliders need to be declared “convex” to enable
collision testing:
- Select a movable objects’ sprite in the Sprite Collection Editor window and tick “Force Convex” at the ColliderGen TK2D window.
- Tick “Convex” at the Sprite Collection Editor window. Now the object is ready for collisions.
- Repeat (1) and (2) for all other movable sprites Multi-Object editing is supported however, so you can select multiple sprites at once as well.
- Close the Sprite Collection Editor window first, then close the ColliderGen TK2D window. (The Sprite Collection Editor window won’t close as long as the ColliderGen TK2D window is open.)
- Commit the changes in the Sprite Collection Editor window.
Reference
Menu Entries
2D ColliderGen Menu
- Add AlphaMeshCollider: Add an AlphaMeshCollider component to all selected game objects. Default parameter settings can be modified via the Collider Preferences window. Ignore this menu entry if you are using the 2D Toolkit (TK2D) framework and use the menu entry 2D Toolkit Specific – Show ColliderGen TK2D Window instead.
- Select AlphaMeshCollider Children: Select all child game objects (recursively) that have an AlphaMeshCollider component attached. Ignore this menu entry if you are using the 2D Toolkit (TK2D) framework and use the menu entry 2D Toolkit Specific – Show ColliderGen TK2D Window instead.
- Remove AlphaMeshCollider Components: Remove 2D ColliderGen components from all selected objects. This includes AlphaMeshCollider and MeshCollider components. Ignore this menu entry if you are using the 2D Toolkit (TK2D) framework and use the menu entry 2D Toolkit Specific – Show ColliderGen TK2D Window instead.
- SmoothMoves Specific – Add AlphaMeshCollider To BoneAnimation (SmoothMoves only): Add an AlphaMeshCollider component to all child game objects that correspond to a bone in the BoneAnimation hierarchy. This way you can quickly add colliders to an animated SmoothMoves character. Ignore this menu entry if you are using the 2D Toolkit (TK2D) framework and use the menu entry 2D Toolkit Specific – Show ColliderGen TK2D Window instead.
- 2D Toolkit Specific – Show ColliderGen TK2D Window (2D Toolkit only): Open the ColliderGen TK2D window which integrates 2D ColliderGen functionality with the 2D Toolkit Sprite Editor. The 2D Toolkit Sprite Editor window automatically show up when the ColliderGen TK2D window is open. In order to close the Sprite Editor window you have to close the ColliderGen TK2D window first.
- Collider Preferences: Open the collider preferences window where you can setup default collider parameter values.
ColliderGen TK2D Window
The “ColliderGen TK2D” window extends the 2D Toolkit Sprite Collection Editor window by functionality to generate MeshColliders for all selected sprites. The window offers parameters such as the number of outline vertices, convexity of the mesh, etc. It also supports multi-object editing, so you can select multiple sprites at once and tweak their colliders simultaneously.

- Editor Live Update: Update the collider immediately when changing any values. Disable live update if your computer is too slow to smoothly update the collider and hit ‘Update Collider’ manually instead.
- Outline Vertex Count: The point count of the collider shape. Note that if your sprite image has fewer corners (e.g. a box with only four corners) it will not spend unnecessary vertices.
- Alpha Opaque Threshold: Alpha threshold value in [0..1] above which a pixel is treated as opaque and thus contributes to the outline shape.
- Force Convex: Creates a convex collider. Useful for objects which shall collide with other mesh colliders. If this is a requirement, tick ‘Convex’ in the SpriteCollection editor window, too.
- Flip Normals: Flips the normals inside-out. You may want to enable ‘Show Normals’ in the SpriteCollection editor window.
- Custom Image: Set a custom image to be used for collider calculations instead of the normal sprite texture.
- Custom Scale: Scales the collider from its center. [1]
- Custom Offset: Translates the collider. An offset of 0.5 translates it by half the image size. [1]
- Button “Update Collider”: Click to manually update the polygon collider. You might want to enable ‘Editor Live Update’ instead if your computer is fast enough.
AlphaMeshColliderRegistry
As soon as at one AlphaMeshCollider has been added to the scene, an AlphaMeshColliderRegistry object is automatically added to the scene. It displays an overview of all different collider groups and provides convenient access to each of them.
The AlphaMeshColliderRegistry displays as follows in the inspector:
Collider Preferences Window
In this window you can modify the default values of some parameters.

- Collider Directory: Set the default output directory for generated collider mesh files (collada .dae files). Ignore this parameter if you are using 2D ColliderGen with the 2D Toolkit framework – the 2D Toolkit Sprite Editor stores the generated collider meshes differently.
- Live Update: Update the collider immediately when changing any collider-parameters. Disable live update if your computer is too slow to update the collider smoothly and hit ‘Recalculate Collider’ manually instead.
- Outline Vertex Count: Default point count of the collider shape. Note that if your sprite image has fewer corners (e.g. a box with only four corners) it will not spend unnecessary vertices.
- Vertex Count Slider Max: Maximum value of the outline vertex count slider.
- Z-Thickness: Default thickness of a collider. Ignore this parameter if you are using 2D ColliderGen with the 2D Toolkit framework – the 2D Toolkit Sprite Editor uses its own custom thickness.
2D Toolkit Documentation