
Using 2D ColliderGen With Unity 4.3 Built-In Sprites
[divider_advanced color=”#0067A3″ paddingTop=”0″ paddingBottom=”10″ thickness=”4″ width=”100%” top=”true”]
[four_fifth_last]
The workflow is similar to using the Orthello framework – you can simply add AlphaMeshColliders to your sprite game objects. The AlphaMeshCollider then analyses the SpriteRenderer component of the GameObject and builds the collider based on it.
[/four_fifth_last]
Video Tutorial (Same Workflow as with Orthello)
[divider_advanced color=”#0067A3″ paddingTop=”0″ paddingBottom=”10″ thickness=”4″ width=”100%” top=”true”]
[lightbox title=”2D ColliderGen Tutorial Video – Orthello” href=”#youtube_lightbox_orthello” inline=”true” width=”1280″ height=”720″]![]() [/lightbox]
[/lightbox]
[divider_padding]
General Workflow
[divider_advanced color=”#0067A3″ paddingTop=”0″ paddingBottom=”10″ thickness=”4″ width=”100%” top=”true”]
[four_fifth]
When using Unity 4.3 built-in sprites, the workflow is centered around adding AlphaMeshCollider components to your game objects which will generate the MeshCollider or PolygonCollider2D. At these components you can tweak parameters such as the number of outline vertices, convexity of the mesh, etc.
Please take a look at the reference section below for further information on all parameters or watch the video tutorial which demonstrates the effect of the different parameters.
Steps
- Add 2D sprites to the scene.
We assume that you already know how to add and set up 2D sprites.
If you are not familiar with Unity 4.3 Sprites yet,
we recommend to check out the Unity documentation first. - Prepare movable game objects by adding Rigidbody physics components to them.
Without Rigidbody components, your objects will remain static. - Select all objects that you wish to add a generated MeshCollider or PolygonCollider2D to.
- Choose “2D ColliderGen” – “Add AlphaMeshCollider” from the menu bar.
Colliders will be generated automatically.
An AlphaMeshColliderRegistry object is automatically added to the scene
which keeps track of all AlphaMeshColliders and offers convenient access. - Set the “Collider Type” parameter
of the AlphaMeshCollider component to MeshCollider or PolygonCollider2D. Note that you can set the default value for this parameter via the Collider Preferences window. - Select objects where you are unhappy with the collider shape and tweak the “Outline Vertex Count” parameter
of the AlphaMeshCollider component. - MeshCollider only: MeshCollider Rigidbody objects don’t collide with other MeshCollider objects yet –
one of two colliding MeshColliders needs to be declared “convex” to enable
collision testing:- Select the movable objects and tick “Force Convex” at the
AlphaMeshCollider component. - Tick “Convex” at the MeshCollider component.
Now they are ready for collisions.
- Select the movable objects and tick “Force Convex” at the
You are done – enjoy physics.
[/four_fifth]
[divider_padding]
Reference
[divider_advanced color=”#0067A3″ paddingTop=”0″ paddingBottom=”10″ thickness=”4″ width=”100%” top=”true”]
[divider_padding]
Menu Entries
[divider_advanced color=”#0067A3″ paddingTop=”0″ paddingBottom=”10″ thickness=”2″ width=”100%” top=”true”]
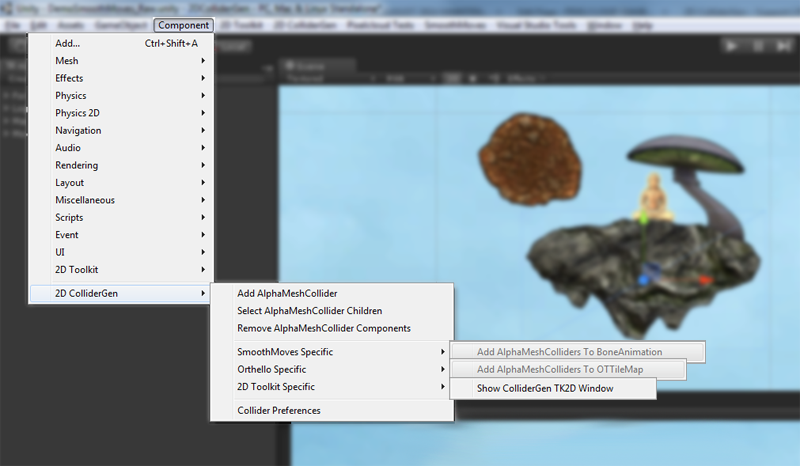
The 2D ColliderGen package adds a 2D ColliderGen menu to the Component menu where you will find the following menu items:
[two_fifth]
[/two_fifth]
[three_fifth_last]
2D ColliderGen Menu
[list style=”list1″]
- Add AlphaMeshCollider: Add an AlphaMeshCollider component to all selected game objects. Default parameter settings can be modified via the Collider Preferences window.
- Select AlphaMeshCollider Children: Select all child game objects (recursively) that have an AlphaMeshCollider component attached.
- Remove AlphaMeshCollider Components: Remove 2D ColliderGen components from all selected objects. This includes AlphaMeshCollider and MeshCollider components as well as AlphaMeshColliderSmoothMovesRestore components which are added to animated SmoothMoves objects.
- SmoothMoves Specific – Add AlphaMeshCollider To BoneAnimation (SmoothMoves only): Add an AlphaMeshCollider component to all child game objects that correspond to a bone in the BoneAnimation hierarchy. This way you can quickly add colliders to an animated SmoothMoves character.
Ignore this menu entry if you are using the Orthello framework. - 2D Toolkit Specific – Show ColliderGen TK2D Window (2D Toolkit only): Open the ColliderGen TK2D window which integrates 2D ColliderGen functionality with the 2D Toolkit Sprite Editor. The 2D Toolkit Sprite Editor window automatically show up when the ColliderGen TK2D window is open. In order to close the Sprite Editor window you have to close the ColliderGen TK2D window first.
Ignore this menu entry if you are using the Orthello framework. - Collider Preferences: Open the collider preferences window where you can setup default collider parameter values.
[/list]
[/three_fifth_last]
[divider_padding]
AlphaMeshCollider
[divider_advanced color=”#0067A3″ paddingTop=”0″ paddingBottom=”10″ thickness=”2″ width=”100%” top=”true”]
[four_fifth_last]
In order to automatically generate polygon colliders for a sprite game object, you add an AlphaMeshCollider component to it which calculates the collider based on the sprite image’s alpha channel. The colliders are created within the Unity3D editor and therefore
The AlphaMeshCollider component provides a number of parameters such as the number of outline vertices, convexity of the mesh, etc. It also supports multi-object editing, so you can select multiple objects at once and tweak their colliders simultaneously.
There is a menu item “2D ColliderGen” – “Add AlphaMeshCollider” to add AlphaMeshCollider components to all selected objects.
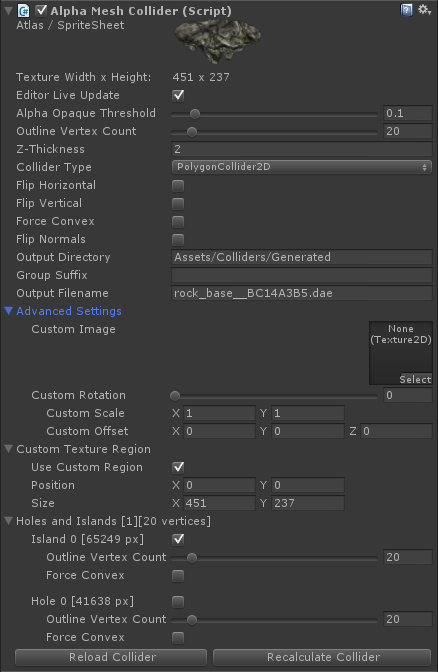
AlphaMeshCollider components provide the following parameters in the inspector:
[/four_fifth_last]
[one_half]
[/one_half]
[one_half_last]
[list style=”list1″]
- Texture Image: The texture currently used for collider calculations (Read-only). In order to use a custom image you can set the Advanced Settings – Custom Image parameter.
- Texture Width x Height: The resolution of the texture image.
- Editor Live Update: Update the collider immediately when changing any values. Disable live update if your computer is too slow to smoothly update the collider and hit ‘Recalculate Collider’ manually instead.
- Alpha Opaque Threshold: Alpha threshold value in [0..1] above which a pixel is treated as opaque and thus contributes to the outline shape.
- Outline Vertex Count: The point count of the collider shape. Note that if your sprite image has fewer corners (e.g. a box with only four corners) it will not spend unnecessary vertices.
- Z-Thickness: Thickness of the generated collider along the z-axis. Note that this value is further scaled by the Transform component of the Gameobject using it. We recommend setting the Tansform.scale.z values to 1.0 at all sprite Gameobjects and scale them along the x and y axis only.
- Collider Type: Used to switch the generated collider between MeshCollider and PolygonCollider2D. Switches between attached Rigidbody and Rigidbody2D Components as well while preserving rigidbody attributes as well as possible.
- Flip Horizontal: Flip the collider horizontally. Note that this parameter is hidden if ‘Copy OTSprite Flipping’ is ticked.
- Flip Vertical: Flip the collider vertically. Note that this parameter is hidden if ‘Copy OTSprite Flipping’ is ticked.
- Force Convex: Creates a convex collider. Useful for objects which shall collide with other mesh colliders. If this is a requirement, tick ‘Convex’ at the MeshCollider component, too.
- Flip Normals: Flips the normals inside-out.
- Output Directory: The collider mesh is saved as a collada (.dae) file to this directory.
- Group Suffix: When multiple Gameobjects share the same sprite image, the collider is created only once and loaded from disk for the other instances. In order to create two unlinked collider-versions for the same sprite image (e.g. a precise and a more approximate version) you can specify two different group suffixes here.
- Output Filename: The name of the generated collada mesh file (Read-only).
[/list]
Advanced Settings
[list style=”list1″]
- Custom Image: Set a custom image to be used for collider calculations instead of the normal sprite texture.
- Custom Rotation: Rotates the collider around its center.
- Custom Scale: Scales the collider from its center.
- Custom Offset: Translates the collider. An offset of 0.5 translates it by half the image size.
- Button “Reload Collider”: Reloads the collider from disk without recalculating it. See ‘Output Directory’ and ‘Output Filename’.
- Button “Recalculate Collider”: Recalculates the collider from scratch.
[/list]
Custom Texture Region
[list style=”list1″]
- Use Custom Region: If enabled, a custom region will be used for collider computations instead of the whole texture image. Can either be used to crop unwanted pixels or access regions of a custom atlas texture.
- Position: Position of the crop-rectangle in pixels relative to the top left corner.
- Size: Width and height of the crop-rectangle in pixels. Will automatically be clamped to the screen borders in the inspector if position + size would exceed image size.
[/list]
Holes and Islands [number of enabled islands] [total number of vertices]
[list style=”list1″]
- Island/Hole [n]: Whether to enable the island or hole with zero-based index n. Islands and holes are sorted by size in pixels. Note that the outermost hole (Hole with index 0) corresponds to the image borders most of the time.
- Outline Vertex Count: The point count of the island or hole. Note that if your island or hole image has fewer corners (e.g. a box with only four corners) it will not spend unnecessary vertices.
- Force Convex: Creates a convex collider at the island or hole. Useful for objects which shall collide with other mesh colliders. If this is a requirement, tick ‘Convex’ at the MeshCollider component, too.
[/list]
[/one_half_last]
[four_fifth_last]
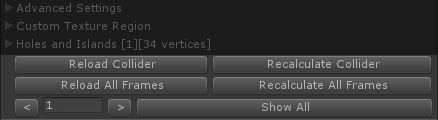
Additional Inspector Elements at Sprite Animations:
[/four_fifth_last]
[one_half]
[/one_half]
[one_half_last]
[list style=”list1″]
- Reload Collider: Reloads the collider of only the currently active Sprite frame.
- Recalculate Collider: Recalculates the collider of only the currently active Sprite frame according to the settings above.
- Reload All Frames: Reloads the colliders of all Sprite Frames.
- Recalculate All Frame: Recalculates the colliders of all Sprite frames according to the current settings, overriding previously generated collider frames.
- Left Arrow <: Decreases the currently active sprite frame index. Note that the sprite image in the scene view also updates accordingly, since the SpriteRenderer’s sprite attribute is set accordingly.
- [n]: Sets the currently active sprite frame index. Index is 1-based.
- Right Arrow >: Increases the currently active sprite frame index. Note that the sprite image in the scene view also updates accordingly, since the SpriteRenderer’s sprite attribute is set accordingly.
- Show All: Shows the colliders of all sprite frames by enabling all collider components. Hit one of the previous buttons to switch back to only a single collider frame being visible.
[/list]
[/one_half_last]
[divider_padding]
AlphaMeshColliderRegistry
[divider_advanced color=”#0067A3″ paddingTop=”0″ paddingBottom=”10″ thickness=”2″ width=”100%” top=”true”]
[four_fifth_last]
As soon as at least one AlphaMeshCollider has been added to the scene, an AlphaMeshColliderRegistry object is automatically added to the scene. It displays an overview of all different collider groups and provides convenient access to each of them.
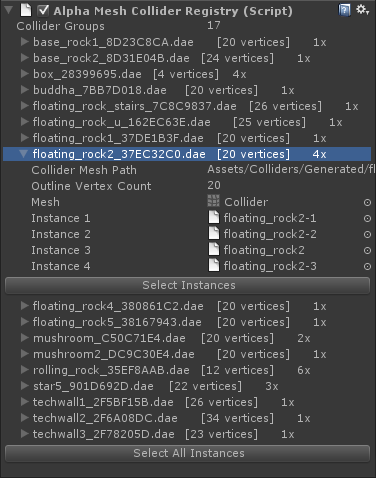
The AlphaMeshColliderRegistry displays as follows in the inspector:
[/four_fifth_last]
[two_fifth]
[/two_fifth]
[three_fifth_last]
[list style=”list1″]
- Collider Groups: The number of collider groups in the current scene.
- floating_rock2_37EC32C0.dae [20 vertices] 4x
[list style=”list1″ color=”gray”][/list]
[list style=”list1″ color=”gray”]- floating_rock2_37EC32C0.dae: Collider file name.
Composed of: the image name, a unique-identifier, optional flipped horizontal/vertical suffixes and the collada .dae extension. - [20 vertices]: Number of outline vertices of the collider.
- 4x: Number of game objects in the collider group which share the same AlphaMeshCollider.
- floating_rock2_37EC32C0.dae: Collider file name.
- Collider Mesh Path: Path of the collada mesh file.
- Outline Vertex Count: Number of outline vertices of the collider.
- Mesh: A link to the collider mesh as loaded from the collada file.
- Instance <number>: A link to each object in the collider group which uses the same instance of the AlphaMeshCollider.
- Button “Select Instances”: Hit this button to select all objects which use the AlphaMeshCollider listed above.
- Button “Select All Instances”: Hit this button to select all objects that have an AlphaMeshCollider component attached.
[/list]
[/three_fifth_last]
[divider_padding]
Collider Preferences Window
[divider_advanced color=”#0067A3″ paddingTop=”0″ paddingBottom=”10″ thickness=”2″ width=”100%” top=”true”]
In this window you can modify the default values of some parameters.
[two_fifth]

[/two_fifth]
[three_fifth_last]
[list style=”list1″]
- Collider Directory: Set the default output directory for generated collider mesh files (collada .dae files). Ignore this parameter if you are using 2D ColliderGen with the 2D Toolkit framework – the 2D Toolkit Sprite Editor stores the generated collider meshes differently.
- Live Update: Update the collider immediately when changing any collider-parameters. Disable live update if your computer is too slow to update the collider smoothly and hit ‘Recalculate Collider’ manually instead.
- Outline Vertex Count: Default point count of the collider shape. Note that if your sprite image has fewer corners (e.g. a box with only four corners) it will not spend unnecessary vertices.
- Vertex Count Slider Max: Maximum value of the outline vertex count slider.
- Z-Thickness: Default thickness of a collider. Ignore this parameter if you are using 2D ColliderGen with the 2D Toolkit framework – the 2D Toolkit Sprite Editor uses its own custom thickness.
[/list]
[/three_fifth_last]